Monday 31 May 2010

Homemade soap


I did it! I made soap!

It’s curing in a box on the kitchen table right this moment. It was easy. I’m not absolutely guaranteeing that what comes out is going to be usable soap, but if it is, then I shall definitely be making lots more. I fragranced this one with lavender and geranium essential oils, but I may make another batch and use ylang ylang and patchouli. I might also dry some of the lavender flowers in our garden and add those. The sky’s the limit. But first I have to clean the blender. It turns out that’s actually more difficult than making the soap. (Stupid cheap Tesco blender. Honestly, I know it's cheap and I shouldn't be supporting Tesco anyway, but why don't they at least make blenders that are fit for purpose?!)

(I used the starter recipe from this book - Smart Soapmaking. I'm pretty sure I didn't have anything at the correct temperature but it seemed to come together, so I'm guessing this recipe is fairly foolproof. I think I put about 30 drops each of the lavender and geranium in, but I don't know how well that will have worked out until I use it.)

Sunday 30 May 2010

A tidy craft room and a clean slate

Silver over at Quicksilver Crafter posted a picture of her craft room (as a before – she is going to reorganise with fabric storage boxes, which sound lovely), and I thought I would show you mine (well actually this was suggested, you can see the comments!). I am actually a bit ashamed, yes. But it is tidy now! I have sorted it out! So: this is my BEFORE picture, the craft room after the havoc wreaked by the Rainbow Patchwork Skirt:

I was using a very useful method of choosing fabrics for patchwork there. It is called, Get Everything You Own Out Of Its Box And Throw It In A Heap On The Floor. Then Go And Make Coffee. I’m surprised more people don’t use this method, because it’s very effective.

And this is after I tidied it today (ignore the kitchen roll! That just proves I dusted):

I am worried you can’t tell from this picture quite how much tidier it is, so I've taken this one:

Look at all that blank floor! Admire the use of a storage box!

I’m pleased I’ve done this, as now I can start next week with a clean(ish) slate. Lots of new projects planned – tshirts and more tiered skirts (hopefully for the etsy shop), and, if I get round to it, a short-sleeve linen jacket. For Me. To force me to learn how to make button holes. And I’ll be finishing and trimming those things you see on the dress form.

There you are: Organisation. A Plan. No more untidiness. Industriousness and Productivity. No getting distracted by random things.

Oh, but wait. What might this be? What arrived very recently in a large box?

Soapmaking supplies! Eeeeeeeek! Well, perhaps I’ll just have a bit of a go tomorrow. It is a bank holiday, after all. Industriousness can surely wait one more day. Can’t it?

Saturday 29 May 2010

The Rainbow Patchwork Skirt!!! (Practically) finished!!!


Ok, I’m excited enough about this skirt that I’m showing it to you unironed, untrimmed, and photographed in crappy light (I might try and take better photos tomorrow to show it off a bit better – it’s really nice). When I got to the third tier on this, I suddenly began to think, this skirt is unwearable; there is no occasion, there is no social gathering, where this skirt will be appropriate on me, a cynical 35-year-old with angular features. And now I’ve finished it and tried it on properly, I can confirm that I was absolutely right. However, I love this skirt so much that I will wear it anyway: I may wear it to Tesco. I may wear it tomorrow to go and buy a barbecue from Homebase (it’s supposed to be nice weather next week.) This is how I made it, in case you want to make one too (you can adapt this easily to different sizes, although I think mine would fit most women (or adventurous men.)) It would also be lovely on a little girl.

Basically I made it from this post on Craftster, and this tutorial. (There is also this woman on Craftster who has made a long one – she deserves a medal. By the time you got to the bottom of that you would be sewing ruffles long enough to go round a house.) I used this order of colours: purple, light blue, green, yellow, pink – I’m not really that fond of yellow but I had to do it in that order because I’d got most fabrics in yellow and pink, for some reason. I used mostly quilting-weight cotton, and this thing can stand up on its own – don’t use anything heavier (lighter, like voile, would be fine.) I used a basic 5 inch square, and cut them all out with scissors – it would be better to do it with a rotary cutter probably but scissors are fine. I worked on a 1/4 inch seam all round but I think it ended up being bigger (it’s difficult to sew the ruffles on only 1/4 inch.) I used 12 purple squares, 18 blue, 27 green, 40 yellow, and 60 pink (increasing by x 1.5 each time). This makes it into a circle skirt – you could get away with a smaller ratio, but I think you’d lose some of the impact. I gathered the ruffles just by machining a long stitch all round and then gathering it by hand – it was quite laborious (although not undoable), so if you’ve got a ruffler foot on anything that would help. Also, I serged all the squares – I serged sides, sewed strips, then serged along each strip before ruffling and sewing to the strip above. I hemmed it by serging the edge of the pink strip and then turning a single hem and topstitching. I added a waistband after I’d sewn it all – it fastens with a drawstring (I don’t like the drawstring I used very much so I haven’t shown that. I might make a patchwork one and add beads, because with a skirt like this, in for a penny). The only thing I didn’t do was prewash all the fabrics, so this skirt might be a disaster waiting to happen. Keep your fingers crossed for me.

I’m normally good at styling clothes but the only things I can think to wear this with so far are: fitted white tshirt, white birkenstocks: fitted denim jacket, brown satin sleeveless tshirt, nude heels, lots of gold necklaces. If anyone has any better ideas, please let me know!

Thursday 27 May 2010

How I got my money's worth out of some spotty fabric

I love patchwork, I do. I buy big bits of fabric sometimes (like, whole metres!) and I think, this time I'm going to definitely make something that's all the same colour. But it never works like that. I think patchwork is for people who can't commit to a whole item in just the one fabric. I don't know if there's a correlation between patchwork and complicated relationship histories but if there is I don't bear it out, because I appear to be programmed to stay with the same mate right until death, like a big boring codependent swan. One of the nice things about patchwork, though, is that you keep finding bits of fabric that you thought you'd used up, and you can look at it and think, look there's that bit left over from The Great Quilt Of 2005 or whatever, and now it's in my skirt. For example: years ago, when I first got my sewing machine, I bought some Kaffe Fassett fabric from Liberty on a weekend in London. I bought half a metre. I think I also bought a book of Biggy Print knitting patterns as well (I made a really nice Biggy Print scarf – this was when I'd just started knitting again and it was basically stocking stitch all the way down – but it felted. I don't think I even washed it: I think it was one of those wools that just felts really easily. Or perhaps I have a hot, damp neck? I don't think I do.)

Anyway, I bought half a metre of purple spotty Kaffe Fassett fabric, because it made me think of amoebas, and when the woman serving me asked me what I was going to do with it, I said, 'I'm going to make a bag!', confidently. I'm not sure what kind of bag I thought I was going to make with only half a metre, no lining, no interfacing, no pattern and no skill. It turned out, I was going to make this kind:
This might have been the first thing I ever sewed on my own (I actually think it was). And you see, even at that early stage I couldn't just leave it be, I had to find some other fabric from somewhere and use the spotty stuff as appliqué. With sequins sewn in some of the spots. I think I was going to sew sequins in all of them but I got bored and went to the pub. I do use this bag though, you can see it is stuffed full (with the sequins actually, ready for a Sequin Emergency).

The spotty fabric disappeared then for a bit, and I lost it. Like the One Ring. Then it reappeared, not via Gollum but via me clearing out a cupboard. So I used it for the Scrappy Cushion which was in Sew Hip. You will see there is a purple and orange theme. You know how people always tell you to trust your instinct with colours/ there is no right and wrong/ all colourways are welcome in the Happy World of Craft? Look at my cushion and beware. (It's comfy, though).
Then I used it as the top of my Amy Butler Gum Drop Pillow. I started making this after my job ended last year. This was at a point in my life when stress had caused me to have no powers of concentration and the Gum Drop Pillow took months (with a hiatus halfway through). If I had known at that point that one year on I would have sufficient capacity for learning to be able to now thread a serger, I would have dropped down dead of shock. I moved Take A Break and the tv remote off the rug to take this picture. That's called styling.
Then I used a bit in a knitting needle case I made for my mother at Christmas. I didn't take a picture sadly but it was modelled on the Colored Pencil Roll from Last Minute Patchwork and Quilted Gifts (there is a nice version here) and it looked very cool, possibly setting in train my current obsession for Rainbow Patchwork items.

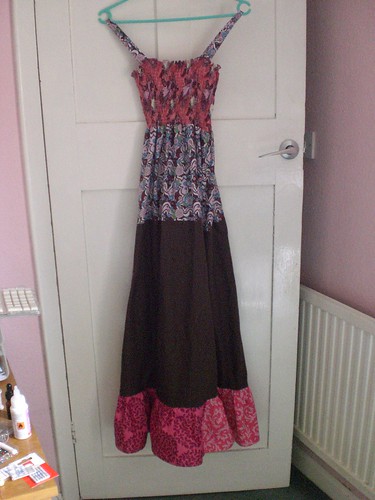
Well, the purple spotty fabric has reappeared again, because I am using it in the Rainbow Patchwork Skirt which I mentioned yesterday. I'm hoping to have finished this monster tomorrow so I can take pics (and move on with my life), but in the meantime here's a taster.
This is the last layer waiting to be serged, hemmed, ruffled and sewn on. It's so long I draped it from my tree to show you the magnitude. Unfortunately the man from a few doors down was wheeling his dustbin back while I was doing this and gave me what is often described as an old fashioned look. Clearly that man is not used to people taking quirky winsome photos for blogs.

I shall go now and eat toast, because there's ruffling to be done, and now I've realised the extent of it I think I need to build up my strength. À demain.

Wednesday 26 May 2010

Oh that Bad, Bad Serger

You remember the serger problem. (Who could forget?) Well, it happened again. It died on me (through no fault of mine this time, I might add). Needles bending, me banging my head against a wall quietly and whimpering. But it’s all fine. The shop swapped it for me, I have a new one now, and I’ll be able to talk about the whole experience one day without twitching. Anyway, now I’ve recovered from the serger trauma of the last few days (unless the bloody new one breaks – no! It couldn’t do, could it? No one could be that unlucky!) I'll be able to update tomorrow with things I’m working on, and pics. A couple of quite exciting things (exciting to me, at least) – a version of this skirt from Craftster, and, when my epic order from Soap Kitchen arrives (hmm. Must sell a few things on ebay) I shall be making soap. Soap! From scratch! With sodium hydroxide! That’s an acid, you know (or is it an alkali? I think it’s an alkali. I’ve ordered goggles. It’ll be fine.)

Saturday 22 May 2010

Shirring for the cackhanded: helpful tips

Some things in life are difficult to explain, but are very easy to do. For example, falling in love. If you tried to explain love, you would have to use words like pheremones and synapses, which would be unpleasant: but, in practice, if you mix strong alcohol with mutual admiration of some obscure band/ foodstuff/ children’s television programme, generally before you know it there you are sharing a bathroom and wondering why your loved one squeezes the toothpaste in such an odd way. And some things are extremely easy to explain and very difficult to do in practice. Do you know what one of those is? Sewing with shirring elastic.
This is my summer dress, for me. I sewed this inspired by a shirred dress in Sew Hip magazine, which gave simple instructions. Essentially, when you shirr you are making a big tube and then pulling it in with elastic to make a smaller, slightly squashy-looking tube. There are no darts, there is no shaping. That should be easy, right? Well, the instructions certainly made it sound easy. You handwind the bobbin with your elastic thread, and then you just sew round and round your tube in a kind of a spiral (using the presser foot as a guide to space the rows) until you have done enough to fit over your bust, and then you clip your threads, put your dress on, and skip away, possibly to some kind of cool festival or a picnic in the park. Result happiness. However. Trying to follow these instructions felt a little bit like nailing a jelly to the ceiling, which is also easy to explain (take one jelly. Stand on chair. Hold jelly against ceiling. Knock nail through jelly with a big hammer – you might need a friend to help you steady the jelly at this point. Voila! Jelly nailed to ceiling! Enjoy!).

Basically, if you try to shirr your dress by sewing round a big spiral, unless you are making a dress for a very small baby (and I suspect this might be the case even then), you will run out of elastic. Elastic thread is thicker than sewing thread: you will have to rewind your bobbin at least once, possibly more. This is fine – rewinding the bobbin is no trouble (it doesn’t have to be tidy – I can make my sewing machine knot up just by looking at it, but my haphazard bobbin winding didn’t cause any problems.) However! You cannot backsew to secure elastic thread: it doesn’t work: I have tried. So, if you are starting again in the middle of your spiral, it is likely to come undone, especially because you have to pull and stretch the elastic as you are sewing to get a bit of flat fabric to sew through. My dress looks pretty on the outside: inside it is Frankenstein’s monster with elastic pulled and knotted and handsewn to secure. Also, it is not easy to use the presser foot as a guide for seams. You have to pull and tug at your fabric to stretch it to sew: sometimes frankly it is not clear what direction you are sewing in, never mind if you are correctly placing the new line of stitching half an inch from the old one.

So this is how I have decided to do it and it seems to be working much better (if a shirred top appears in my etsy shop you’ll know it was ok, if not I’m going to quietly skulk off and never mention it again.) 1/ Sew lines of shirring, not a spiral, and trap the ends in a seam (I will be using a french seam, doubly secure and also I am using sheer-ish fabric.) I’m doing this with a seam on the back, but you could probably use one of the side seams too. Don’t start with a new bobbin half-way through seams – check you’ve got enough to finish before you start. 2/ Mark with washable fabric pen lines where you want to sew – I’m spacing mine half an inch apart. I’m reasonably confident the washable fabric pen is actually washable, if not I’ll be walking about with a grid marked on my chest. Horizontal lines, so flattering! 3/ Sew with a very short stitch length, and I’ve found I need a tight top tension: if my bobbin tension is adjusted correctly, I haven’t found I need to adjust it any more, which is useful as I’m not sure where I’ve put the screwdriver.

Those are my shirring tips, I hope this is helpful. It is a performance but worth doing as it looks attractive, and as you are tripping about in your diaphanous creations only you will know about the bitter tears and swearing at the sewing machine, everyone else will think you are effortlessly chic in a hippie kind of way.

Thursday 20 May 2010

The Granny Square That Grew And Grew


I love granny squares, I love them, and I bet I am one of the few people who learnt to crochet not just in order to make granny squares but in order to make them into something really questionable. Like a skirt. Or a waistcoat. In fact, I have to confess, I look at the reviews of crochet books on Amazon and if any of them say anything like ‘oh God, this book is a hideous throwback to the seventies, who on Earth would wear xxx’ then I get excited and I put that book on my wishlist. Yes. The Seventies: A Much Maligned Decade. Or, The Seventies: Not Just Owls. Well, I haven’t crocheted a wonderful granny square skirt yet, but I have started a granny square. And I have failed to stop. It’s taking on epic proportions. If I can keep going for long enough I’m hoping to have a throw, but, this thing EATS yarn. I daren’t add up what it’s cost me so far. On the subject of which:

The Prodigal Has Returned. Yes, I’d be lurking in my stylish ricepaper bag too if I’d cost almost as much to repair as I did to buy!

Tuesday 18 May 2010

How I killed my serger stone dead and made myself miserable

This is the tragic story of my serger and how I killed it. I hope this can serve as a warning to others because it is too late for me and my serger (well it isn't too late entirely but it is all a bit depressing. You will see.) Well, I decided I wanted a serger about a month and a half ago because I wanted to be able to make tshirts. Also I wanted to be able to make the most marvellous skirt I saw on Craftster which seems to involve about a million patchwork pieces. Would you like to french seam a million patchwork pieces? No, well I wouldn't, either. So, I researched my serger and I considered buying one from these people: and then I read this forum thread: and I reconsidered. What, I thought, if I have any problems with my serger when I have got it? I don't want to be having to send it back to someone who calls customers Nazis. I have enough trouble in my day-to-day life without going looking for it on an active basis. So I bought my serger from a local shop. And I am very, very glad I did. Because I had had the serger barely a week before I ran into problems which were ENTIRELY OF MY OWN MAKING.

I am what you might call an active kind of learner: I do not understand things until I have done them, myself, with my own two hands. I don't read instruction books: I use them as a reference for after I have worked out what I am doing. I cannot learn by reading, or by watching someone else. I do not believe most people are like me, as otherwise no one would bother putting instructional videos for anything on YouTube. As far as I'm concerned, you might as well tell me to look at a video of a sneezing panda and then go and perform open heart surgery, that is how little visual learning means to me. Anyway I have managed very well thus far and this was my approach to the serger. Well, never mind the instruction book: what they should have done with the serger was sell it wrapped in a big bit of paper that said in words a foot high, THIS IS NOT A SEWING MACHINE! YOU CANNOT SEW OVER PINS WITH IT! Because that is the only thing you need to know. Did you know that? I didn't. I know it probably isn't ideal to sew over pins with a sewing machine, but the worst that ever happened to me was that my needle broke and hit me in the eye. And it glanced off my eyelid! So it was absolutely fine. So I naturally assumed you could do the same with a serger. This was mistake number 1. We will pause here for a calming photograph of Cambridge which I took earlier today. Isn't that pretty?


OK, so the difference with a serger is that blades are involved, and somehow this was what the pin buggered up. So it gave a kind of furious screech and stopped, sucking my bit of fabric I was practicing on into its innards. Well, when my sewing machine is difficult with me, I don't take any nonsense, I strip it down, I change needles, I swear, I rethread. So this is what I did. And I ran the serger again. And it made the most awful clanking noise you have ever heard. And the new needles I had put in bent (actually bent!), broke, and flew out. OK, I thought, I did not put those needles in properly, I will try again. And the same thing happened. At this point I began to feel a bit worried. Another calming break: this is Wisteria on Magdalene.


I tried again and actually things became worse. Oh my God, I thought, Oh my God. I have broken my serger. I put it it under the desk and I walked away and made tea, but there are some things tea can't cure and broken sergers is one of them. This is silly, I thought, I will have to deal with it. So I took my serger back to Sew Creative and spoke to the woman who had sold it to me. 'Hmm' I said. 'There are a few problems with my serger. It seems not to be entirely working. I thought perhaps you could press something and make it happier.' She fixed me with a look. 'And what led up to it not working?' she asked, carefully. 'Me!' I said, in an agony of remorse. 'Me! I sewed over a pin! And now my serger is dead! And I have killed it!'. Well, quelle surprise it turns out that this is not unparalleled. This has happened to sergers before. And so my serger was taken away 'it is probably not terminal' and is coming back on Thursday. And I am very excited. But, this is the rub, and we will pause for a very attractive photo of St John's which is my partner's Alma Mater although he is not grateful:


My serger is costing a fortune to repair. A fortune. I am not exaggerating. I could practically have bought another one (well, perhaps a second hand one.) So, if you go over a pin, this is a big deal. You will knacker your timing belt. Do not do it. Learn from my mistake. Then you will have a bonus £67+VAT which you can spend on the frivolous item of your choice (although if I remember it is financial reasoning like that which leads to destruction and ultimately death in Bleak House. And if we aren't getting our financial planning advice from Dickens, I don't know where we are getting it from.)

Monday 17 May 2010

Hello, introduction etc

Hello... First blog post so let's do introductions. My name's Susie. I've been sewing for years and years and years, but until last year I mostly made cushions and bags and patchwork, and square things like that. Then last year, the hugely stressful and time-intensive job I was doing ended, and I thought I'd teach myself to sew clothes properly. Well, a few months on and I've restocked my wardrobe, anything that could possibly need a cosy has a cosy, and I haven't got enough time to wear or space to store all the things I want to sew. In fact I'm eyeing up next door's cat and thinking whether he'd be improved by a little quilted jerkin. And he really wouldn't. So I thought I'd see if other people might like my things, because if I can sell some then I can make more. And I don't want to sound naff, because there's enough naffness in life (isn't there?) but nothing would make me happier than to think of other people walking about wearing my clothes. That would be amazing. So I started an etsy shop and it's been quite a learning curve so far (and I've hardly got anything in it yet.) I'm learning more than I ever thought I'd need to know about taking photographs in a house so small we haven't got any blank walls, using Gimp, and engaging with sergers. If I ever get to a stage where I know what I'm doing with any of them I'm going to blog about it.


In the meantime, this is my studio: I say studio: I mean box room. You note I'm not showing you the floor? The picture is by Dave who I used to work with. Dave has some lovely pictures – look on his site. But don't go buying all the Sun ones, because I'm having one of those as soon as I've got a bit of spare money. And the plant is a Peace Lily. It's the only plant I've ever not killed. I haven't given it a name because I don't want to become too attached (well, I have. I call it Fred. But I don't call it that out loud, because that would be tempting fate.)


This is a shelf full of my books. It has so many books it's actually bending. I won't tell you what I think about Weekend Sewing because I'm trying to be upbeat. All I'll say is, do you remember when Les Dawson used to dress as a woman? I looked like that in the Kimono dress.


And this is my tree. It only looks like that for about 5 minutes but while it does it's spectacular and I rush about taking photos. I thought it was appropriate for Spring and new beginnings.

Thanks for reading. I'll be back tomorrow to tell you my adventures with my serger because I'm hoping my experience can serve as a warning to others: that might give me some comfort, at least.